
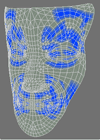
In particular, I disagree with something that seems to be conventional wisdom about Lightwave export to Shockwave3D. You can have more than one weight map influence a vertex. Before, it was said that each vertex is assigned 100% to a single bone, but that's not true - you can spread a vertex's influence over multiple bones and it will work.
The article contains two Lscrpts (scripts for controlling Lightwave) I wrote which help ease the process. There's a "Weight Detail" script which lets you set the weight values of a point (or a set of points) across all your weight maps all at once in one dialog. This is really handy, since Shockwave3D likes all the weight maps to add up to 100%. The other Lscript is "Weight Analysis" which will analyze your model for you and show you all the vertices which don't have 100% weight assigned to them. That way, it's easy to find problem areas in your model before export.
I also mirror Mike Green's "BlurVMaps" script, which is also handy for blurring the weight maps so that they flow naturally over the surface.
Taken together, these Lscripts really make preparing models in Lightwave for Shockwave3D export a lot easier.
No comments:
Post a Comment